

The share of work that happens on a computer has grown enormously compared to a few years ago.
Everyone works differently, too — some people keep the same handful of programs open all day and process correspondence through them, others build documents in Excel and fire off dozens of emails, saving all kinds of files along the way.
Since how you work varies so much from person to person, your desktop setup ends up varying just as much.
If your desktop is the entry point to pretty much everything you do, have you ever tried introducing a small system to it? A tidy entry point makes the actual work go surprisingly smoothly too.
📋 What this article covers
- How to organize your desktop into 5 zones
- Icon size, spacing, and taskbar auto-hide settings
- How to draw dividing lines in Paint to make a wallpaper
- Building a system where tidiness happens naturally
Desktop space is limited
What does your desktop look like right now?
If icons are crammed together with barely a gap between them, but you personally know exactly where every file is — that’s fine, honestly. Whatever works for you works.
But since it’s a shared work computer, the baseline should be that anyone can use it and find things easily.
Before you know it, icons pile up, files go unsorted, and the desktop gets buried — the cycle of tidying up never quite gets started.
So the idea here is to set up zones on your desktop so it organizes itself naturally — dedicated ground for work priorities, shortcut icons, and resident icons to live.
How I customized my desktop
⚠️ A note on Windows versions
This article was originally written around Windows 7. The core ideas still apply on Windows 10/11, but a few settings have moved. On Windows 11, “auto-hide the taskbar” is under Settings → Personalization → Taskbar → Taskbar behaviors.
Suitman’s own PC runs Windows 7, so the walkthrough below follows that environment.
You may need to adjust a step or two for your own setup — bear with me!
Decide on your icon size
With nothing selected on the desktop, try holding Ctrl and scrolling the mouse wheel.
Icons will grow or shrink, so pick a size you’re comfortable with.

If Ctrl + scroll doesn’t do anything on your machine, right-click the desktop → View → pick anywhere between Large icons and Small icons.
Not too big, not too small — that’s the sweet spot.
Set icons to line up at even spacing

If icons are set to auto-arrange, switch that setting to line up at even spacing instead.
This lets you place icons evenly anywhere on the desktop.
Set the taskbar to auto-hide
Normally the taskbar is always on screen, but if you don’t need it visible while you work, setting it to auto-hide gives you more screen real estate. Right-click an empty spot on the taskbar (at the very bottom of the screen).
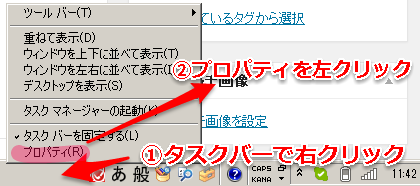
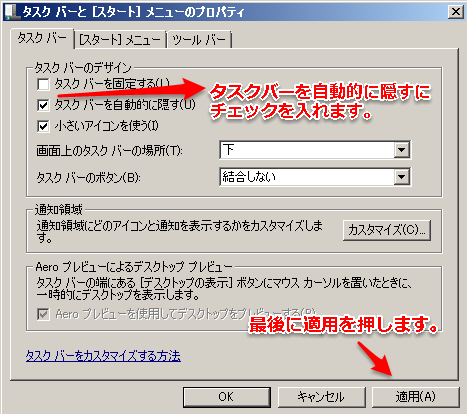
Check the box for “auto-hide the taskbar” and hit apply.
The taskbar disappears from view, but moving your mouse to the bottom of the screen brings it right back.
It feels a bit odd at first, but you get used to it fast.
Set the desktop background to a plain solid color, for now
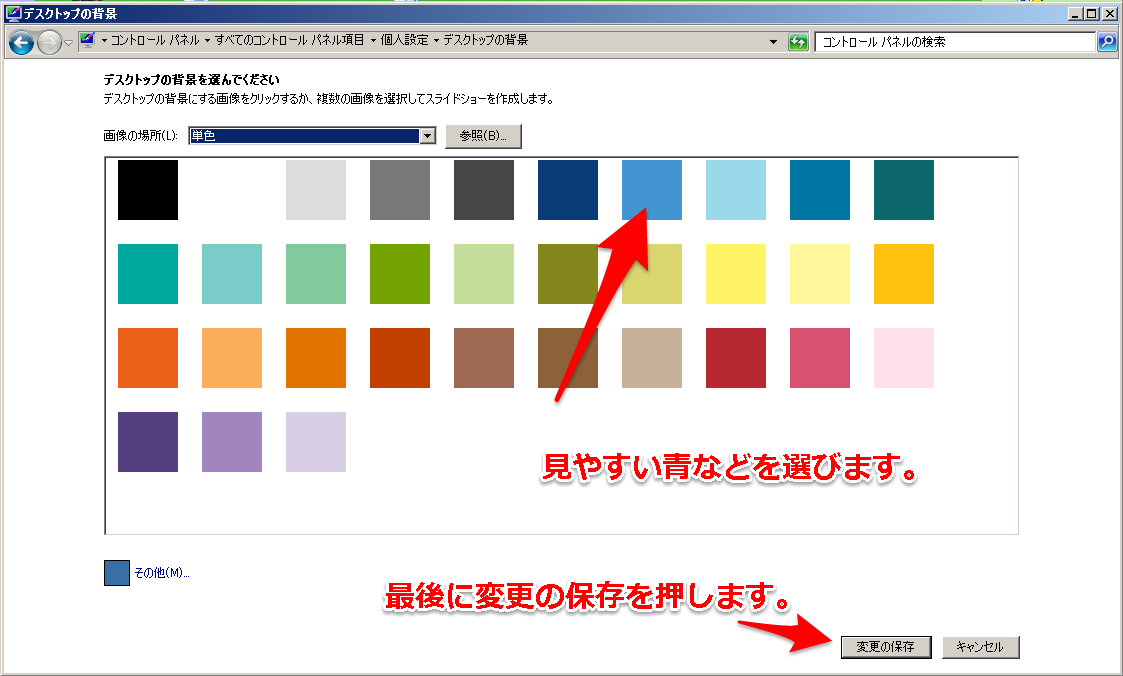
Set your current desktop background to a plain solid color. This makes it much easier to see where you’re placing icons in the next step.
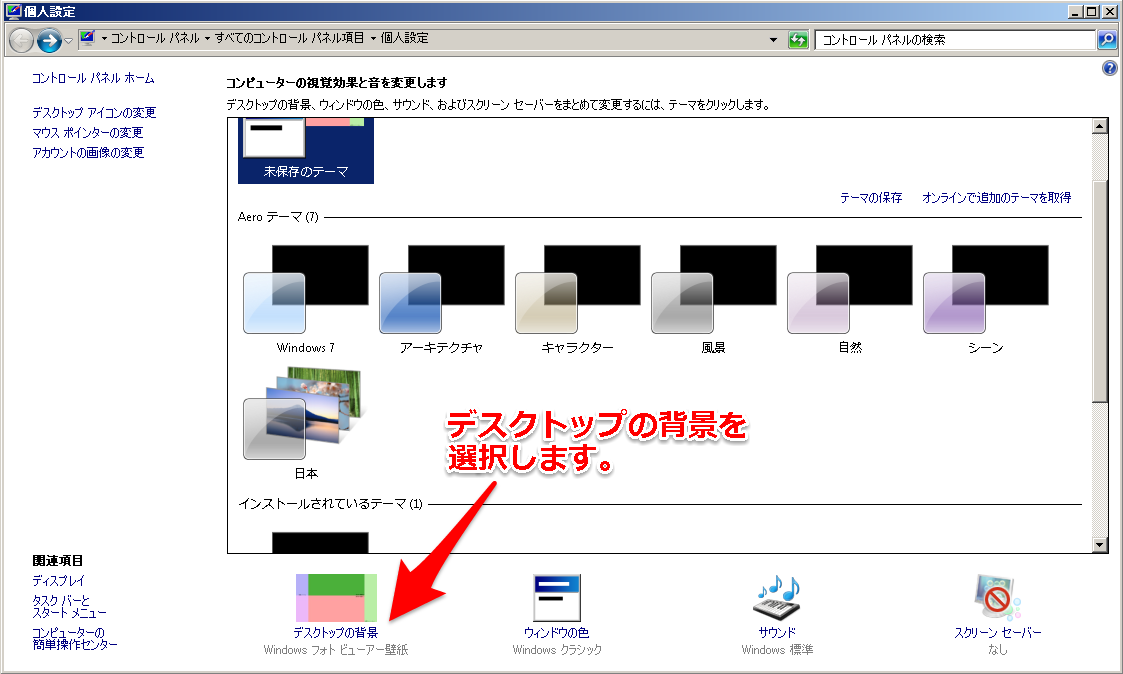
Right-click anywhere without an icon on the desktop and choose “Personalize” from the menu that appears.

Choose “Desktop Background” near the bottom.
Pick “Solid Colors” from the dropdown list.
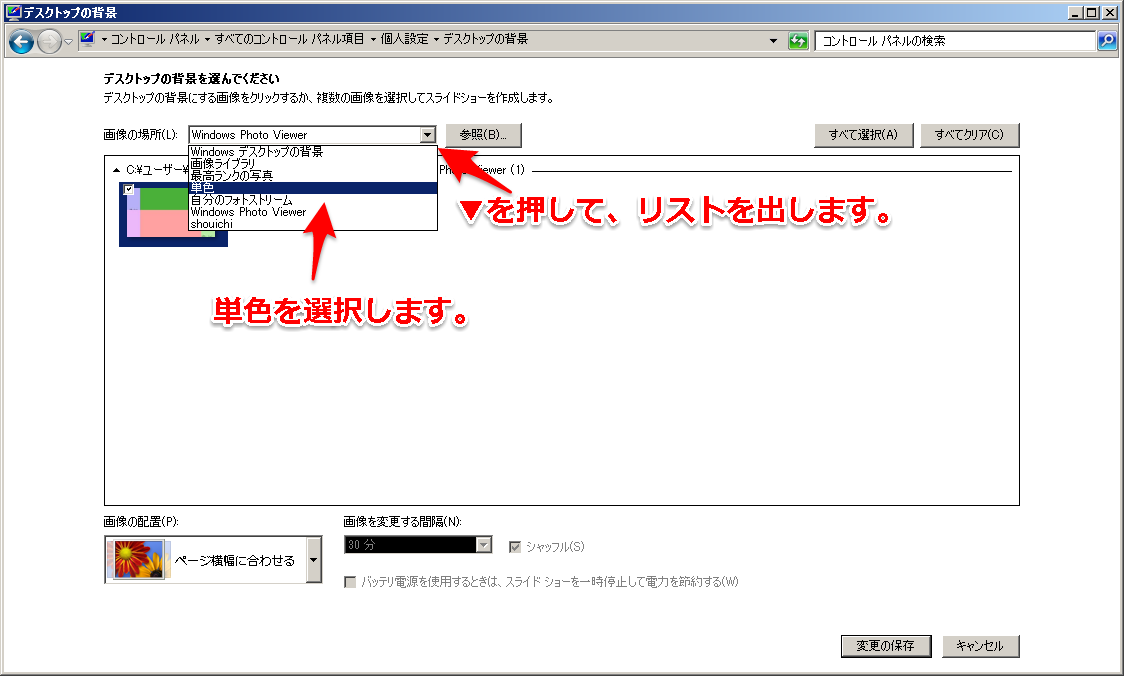
Pick a solid color — an easy-to-read blue works well here.
Roughly lay out your icons
To give you an idea of what this looks like, here’s a reference photo of Suitman’s own desktop.
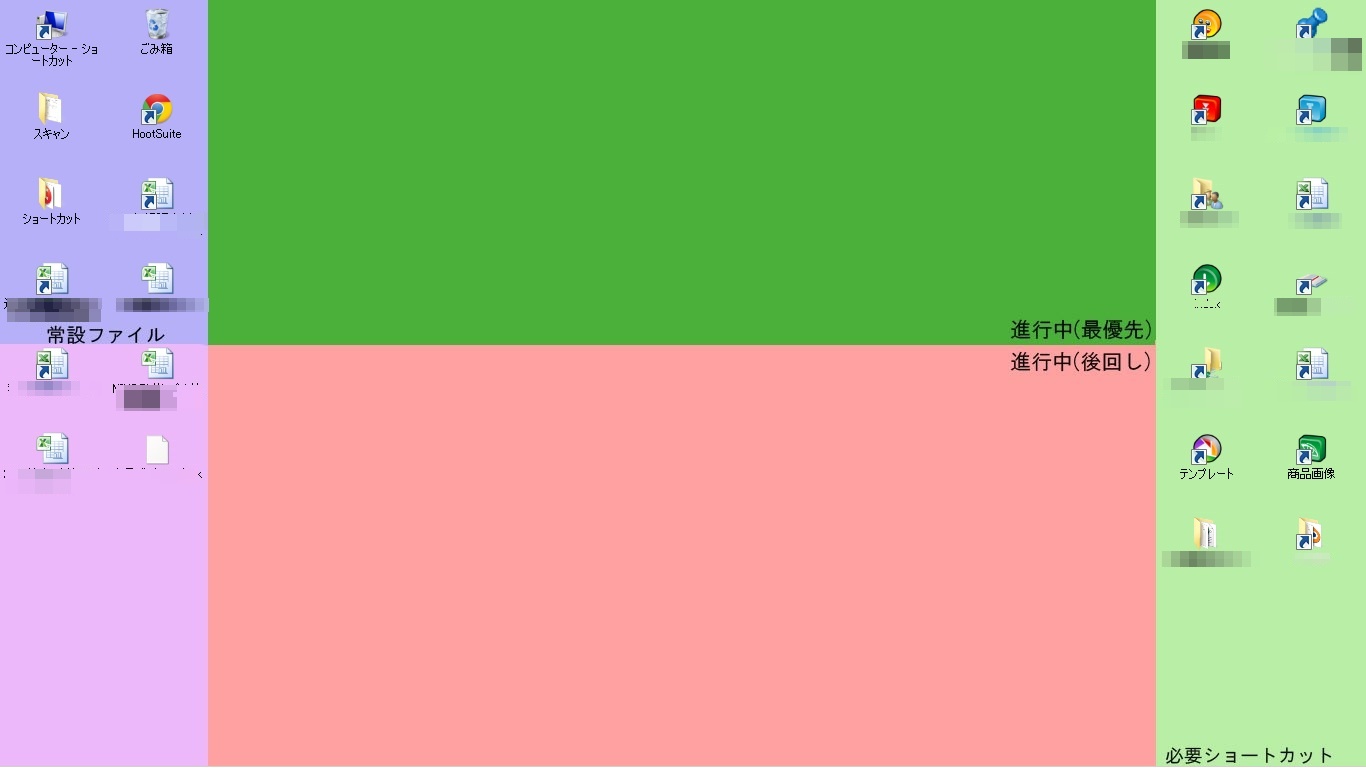
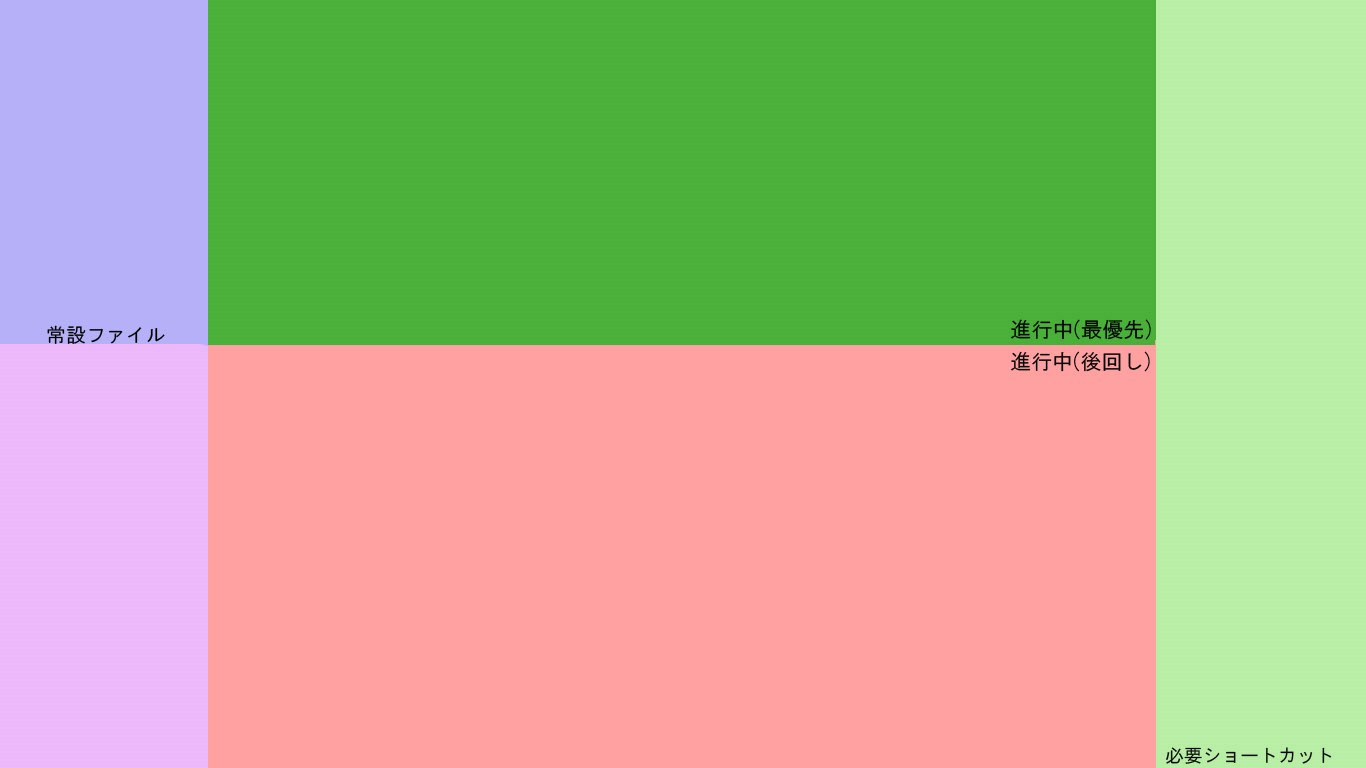
I split it into five sections.
| ① Top-left “Resident files” zone | Files you want on the desktop permanently — think microphone software, a recycle bin shortcut, that sort of thing. |
| ② Bottom-left “Miscellaneous” zone | A place for temporary staging. Could be things you’re reviewing before deleting after finishing a task, or whatever other rule works for you. |
| ③ Top-center “In progress (top priority)” zone | Staging ground for files you’re actively working on right now. This can double as the spot where you feel the pressure to actually finish things, though depending on your workload you might want to change the ratio between this zone and ④. |
| ④ Bottom-center “In progress (can wait)” zone | Files that are lower priority for now. Fine to deal with later, but don’t want to forget — like something due at the start of next week that you flagged at the start of this week. |
| ⑤ Right side “Quick shortcuts” zone | Home for all your various shortcuts. |
Take a look at your own work files, first design roughly which categories you want, and then place them into 5–6 zones on the screen as you go.
You’ll get a much cleaner layout if you tidy up any unneeded files or shortcuts to a minimum first.
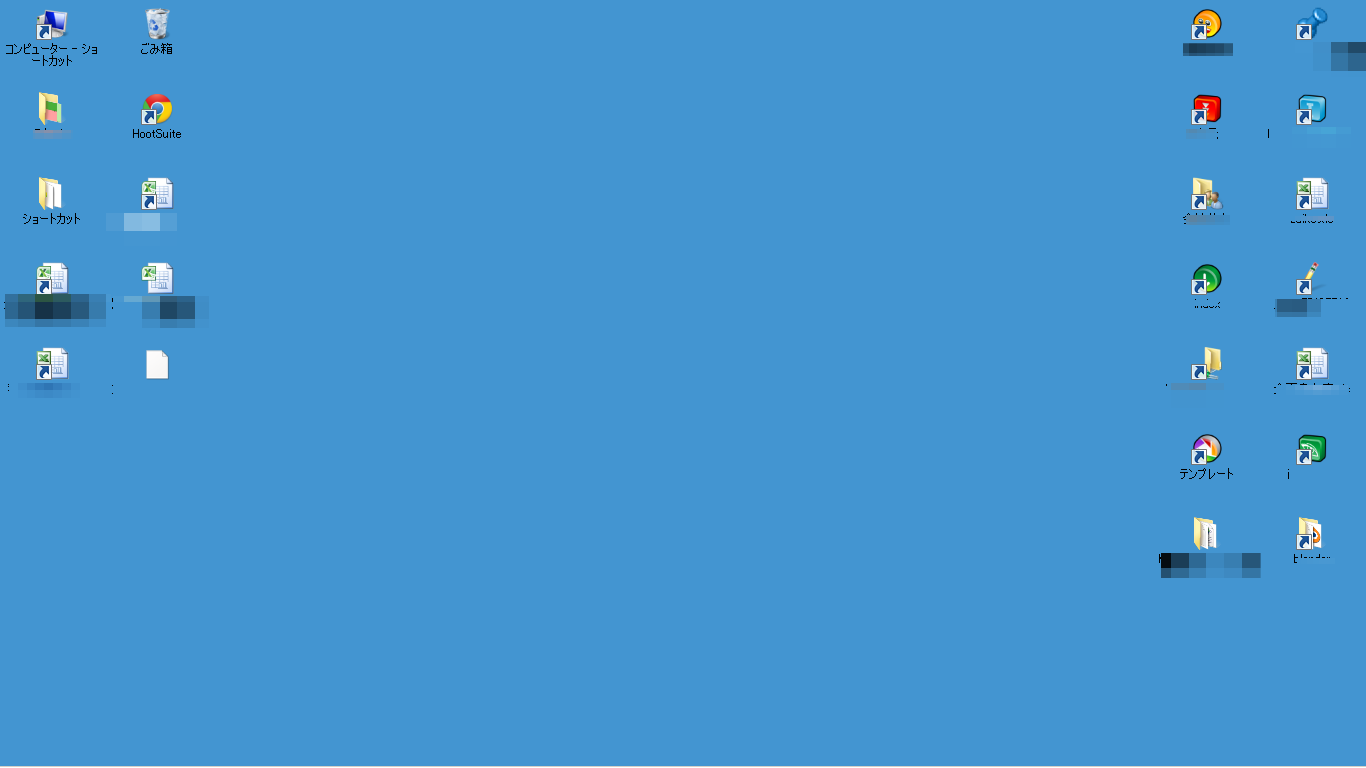
Since the background is now a plain solid color from the earlier step, picture the zone boundaries in your head and place icons into the categories you designed.
Here’s what that reference photo above looks like against a blue background:
Finally, touch it up and fine-tune with Paint
Using the Paint app that comes built into Windows, mark out the sections with dividing lines and colors so they’re easy to tell apart at a glance. If you have something like Photoshop or another paint program, that works too, of course — Paint is more than capable for this.
From here the exact steps will vary a little depending on your environment, so treat this as a reference for the general idea, aiming to get your icons lined up neatly.
1. With your icons arranged how you want on the desktop, hit PrintScreen
The exact key combo varies by machine (some need Fn), but Print Screen copies whatever’s currently showing on your desktop. This captures your current icon layout as an image.
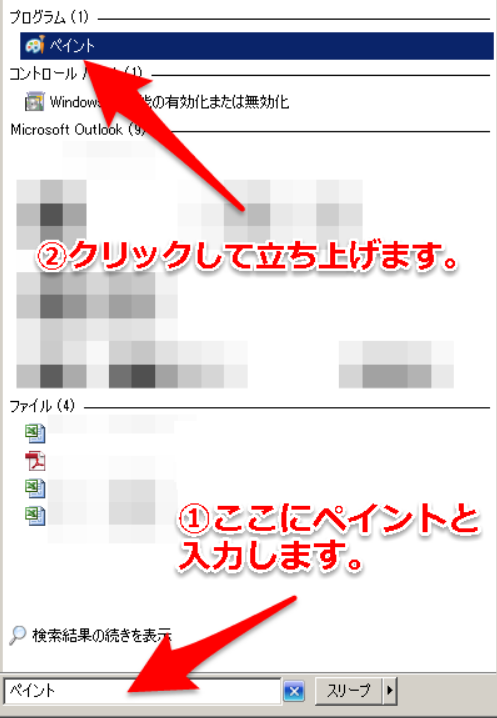
2. Open Paint
Hit the Start menu, type “Paint” into search, and click the icon that appears. You can also get there via Start → All Programs → Accessories → Paint.
3. Paste the desktop screenshot into Paint
With Paint open, paste (Ctrl+V) the screenshot you copied earlier. You can also click the paste icon in the top-left.

4. Mark out your categories in Paint
Here’s a quick video walkthrough. As an example, I mark out the zones and save the result as my desktop background.
5. Set the finished image as your desktop background
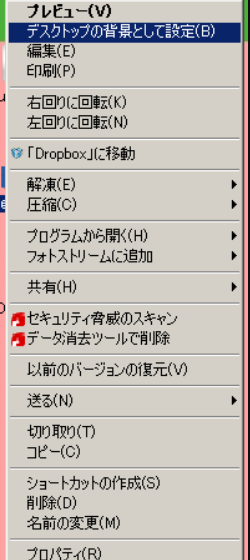
Save your marked-up image from Paint as a JPEG, then set it as your desktop background.
If you saved it to the desktop, right-clicking the resulting icon brings up the selection screen shown above — choose “Set as desktop background.”
Can you see your desktop layout more clearly now?
At this point you’ll probably want to nudge things here and there — an icon slightly off, a file name sitting right on a dividing line. Since this depends entirely on your own environment and icon layout, just repeat step 4 (mark out categories in Paint) and fine-tune until it’s exactly right.
Dividing your desktop into categories makes tidiness a habit
How does your newly organized desktop feel?
I think it’s a bit like the satisfaction of tidying your own room — that same refreshed feeling.
There’s software out there that automatically sorts desktop icons and helps you stay organized, but there’s real value in something this simple you can just do yourself, right now.
Being able to actually go do it right away is, in itself, plenty of a reason.
Once you’ve set up your zones, I think you’ll find things stay tidy almost automatically from here on — so go ahead and power through your work!
If your screen resolution happens to be 1366×768, feel free to use the wallpaper Suitman made, too ♪
Credit me somewhere if you redistribute it — that’d make me happy.
✅ Today’s recap checklist
- ☐ Adjusted icon size with Ctrl + scroll
- ☐ Changed icon arrangement to “even spacing”
- ☐ Set the taskbar to auto-hide
- ☐ Set the desktop background to a solid color
- ☐ Designed 5 zones (resident / miscellaneous / in-progress top priority / in-progress can-wait / shortcuts)
- ☐ Drew dividing lines in Paint to make a wallpaper
- ☐ Set the finished wallpaper as the desktop background
☕ Enjoyed this post?
I'm a Japanese blogger who spent 8 years relearning English from scratch.
If this post helped you, a coffee would mean a lot — thank you for reading!


Leave a Reply